First you need to connect your Figshare account to your ORCID account. You can do this straight from “Edit Profile” or from the Applications page. Click “Connect” and you’ll be sent off to ORCID to verify your account and then we can get started. You’ll then be presented with 3 options, all off by default.

This option creates a record in your ORCID account of any items that you publish on Figshare. It’s good to note that this will create a record using the base DOI only, versioned DOIs are omitted. The base DOI will always point to the latest version of your item. This long-requested functionality avoids the issue of significant duplicate entries within your ORCID account.
Please note: if you have a synchronization set up from a DOI provider like Datacite and you enable this option, there is a chance you’ll get duplicate records in your ORCID account.
This feature will only kick in for items created after the integration has been performed. Any existing items in your Figshare account will not be pushed using this method. If you need to get historic items into your ORCID account and they have not been captured by the existing Datacite integration, this will need to be done manually.
This one is all about your Figshare profile and your profile only. Nothing imported here will interact with your My Data area (that’s where option 3 comes in).
This will import everything in your ORCID works section to the publications area of your Figshare profile. Unlike the previous setting, this will import everything BEFORE the integration was performed as well as anything created ongoing.

After the integration has occurred, any new records created within the works section of your ORCID account will automatically create a new draft metadata record within your My Data area. We’ll pull in as much available metadata as we can, as well as creating the metadata record with the DOI of the original object.
Once a new draft item has been created from this integration, you’ll get two kinds of notifications: an email to your account email address and a notification within the platform. You can then choose to add a file for this record, such as an open access version of a publication, and any additional metadata or delete the draft record if it’s not needed.

Visit the Figshare help portal for more information on how to sync your ORCiD to Figshare.
Creating a record in Federation.figshare is easy. Each field displays an explanation of the information required for a high quality record when you click on the ‘more information’ link.
There are two ways to create a record.
Browse/drag a file onto the “Drag files to upload” box. The file’s title will be automatically listed in the Title field of the record. The title should be overwritten to a more meaningful title if necessary.
1.

If you choose to browse/drag a file, the file’s title will be automatically listed in the Title field of the record. The title can and should be over written to a more meaningful title.

Click on the “Create new item” button. This provides you with the options to
1. Upload a file or folder. Browse for a file or drag and drop a file.
2. Link a file from an external source. You will be prompted to enter the URL of the site where the linked file is stored. Please note that Federation University is not responsible for maintaining the link or for its validity
3. Create a metadata record only. A prompt will appear to enter a reason why this is a metadata only record. This may be due to the record being about a physical sample.

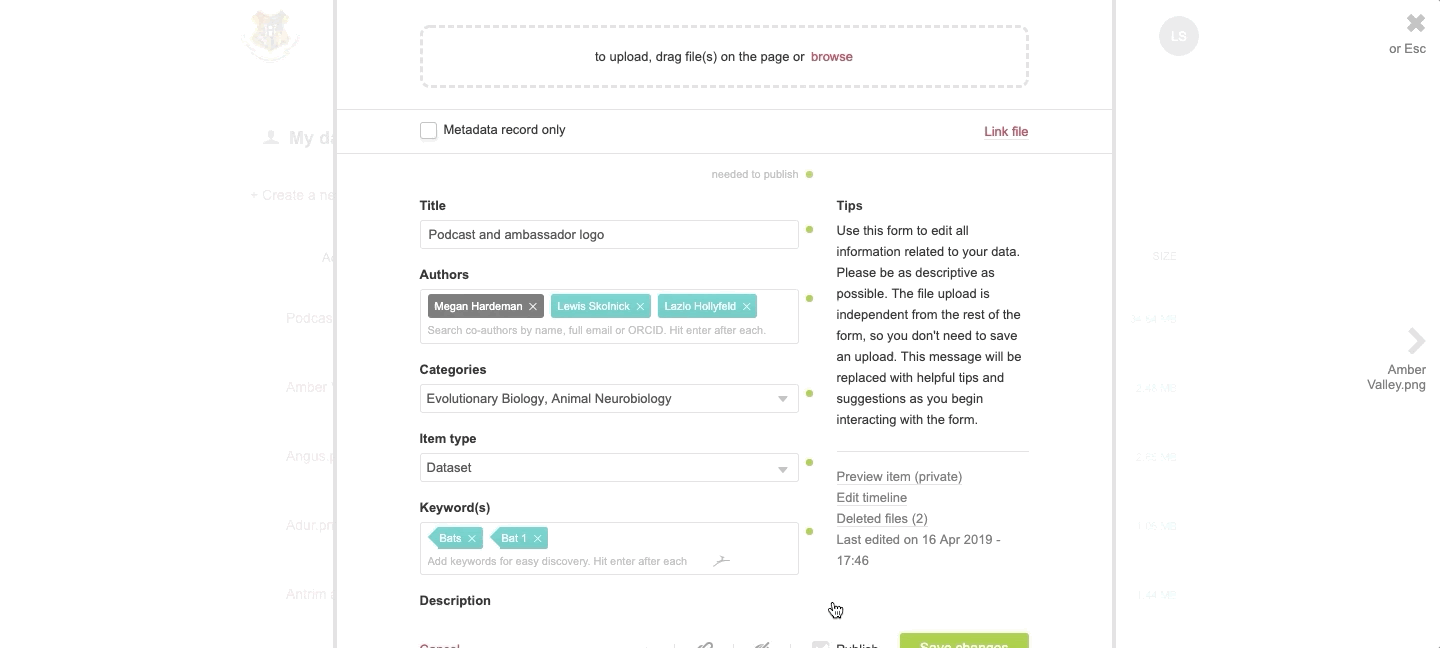
Give your research a title that is more descriptive than just a filename. This will also help make your items discoverable via search engines such as Google. The title should have at least three characters

Your name will automatically be added to the Author field. You can rearrange the order in which the authors appear and remove yourself as an author if you are uploading on behalf of someone. You can also search by entering the email address or ORCID (if the author has synced their ORCID to their Figshare account) of the author you want to add. To add an author who doesn’t have a Figshare account, select Add author details and enter their name, email address (optional), and ORCID (optional).

These are taken from the Australian Fields of Research classifications. You can choose more than one and either select from the drop-down menu or search for your subject area. If you can’t find exactly what you’re looking for, we recommend finding the best option and adding more specific terms in the Keywords field.

Select an item type that best describes your research file to facilitate finding your files.
If unsure of an item type, put your mouse over a type and click on the dark grey ‘I’ to find additional information.

Add keywords that will help make your research more discoverable. Hit return after each keyword you enter. Start typing in the text box for suggestions, or enter your own keywords. These keywords should be more specific than the Category and help others find your research. Add as many keywords as you want - just hit enter after each keyword. Figshare remembers ones you’ve entered previously and will suggest keywords based on keywords that have been added to the database previously.

Add as much context as possible so that others can understand your research and reproduce it. Make sure you include methodology, techniques, and if relevant information about approval for data collection to confirm adherence to legal or ethical requirements. The description should have more than four characters.

Funding
When typing in funder information, Federation.figshare will search the Digital Science Dimensions database for your funder and hyperlink to the Dimensions database.. To add funder information that doesn’t appear in Dimensions, type the funder information into the field and don’t select anything from the drop-down menu.

To add identifiers or links to any relevant content or external sources that help describe the research, click on Manage Materials.

Identifier
Add the identifier (DOI, ISBN, PURL, URL etc.) of the peer-reviewed article/paper or research output you wish to link back to. This is the link destination for the Resource title
Title (optional)
Add the title of the peer-reviewed article/paper or research output you wish to link back to. This will appear on the public page as the link title.
Identifier type
Select from the list of recognised identifiers.
Relationship
Select from the options provided how the additional material provided relates to the main item.

Select the appropriate licence from the list. We encourage open access to all data and other research outputs. Click on the ‘what’s this’ link for a full description of the various licences, or read the ARDC 'Research Data Rights Management' guide to choosing a licence for your data.

Federation.figshare allows researchers to set conditions upon the release of the record, or to generate a pre-publication link or to reserve a DOI
There are a number of reasons why you may want to place conditions around the upload of your files:

Apply temporary or permanent embargo for confidential records
Set an embargo to hide the record from public view for a specific period. Select a time period for the embargo; for sensitive records, select 'permanent embargo' at the bottom of the dropdown menu. Choose whether the embargo is on the files only or on the entire content (files and metadata). You may also add a reason why the item is under embargo. This is useful for people who are viewing the public metadata record.
The embargo period begins as soon as the item is made public. If you set a period instead of a specific date, that period will start on the record’s day of publication.

Generate private link
You will be able to share this link with selected contacts; with Federation University users, or with users outside the university. The link will display the latest saved changes on the item, even though you may have generated it when those changes were not yet applied.

Manage Identifiers: Reserve Digital Object Identifier.
You will be able to share this link with selected contacts; with Federation University users, or with users outside of the university. The link will display the latest saved changes on the item, even though you may have generated it when those changes were not yet applied.
Please note: the DOI becomes active when the item is published.

All mandatory fields must be filled in before the record can be saved. You may edit a record as often as needed before publishing it.

To publish a record the Publish tick box must be checked. Once the Publish tick box has been checked, the ‘Save changes’ box will turn green and read ‘Publish item’.

Other things to consider:
You can go back and edit items after you’ve made them publicly available. Some changes may trigger a new version. See here to find out which amends will generate a new version of your item.
You can also batch edit items that have already been published. In My Data, select the items to be updated, click on Actions at the top of the page, and select Edit in batch.

Once you’ve selected the items to be edited in bulk, select the metadata fields to edit. Custom metadata fields will be displayed here, as well.

Once a file is deleted from an item, you have 30 days to restore it.
Simply select the option to restore it on the right hand side, hover over the file(s) you want to restore, and click on the circular icon to restore the files to the item.